Monday, June 18, 2012

Studio J Layout #2

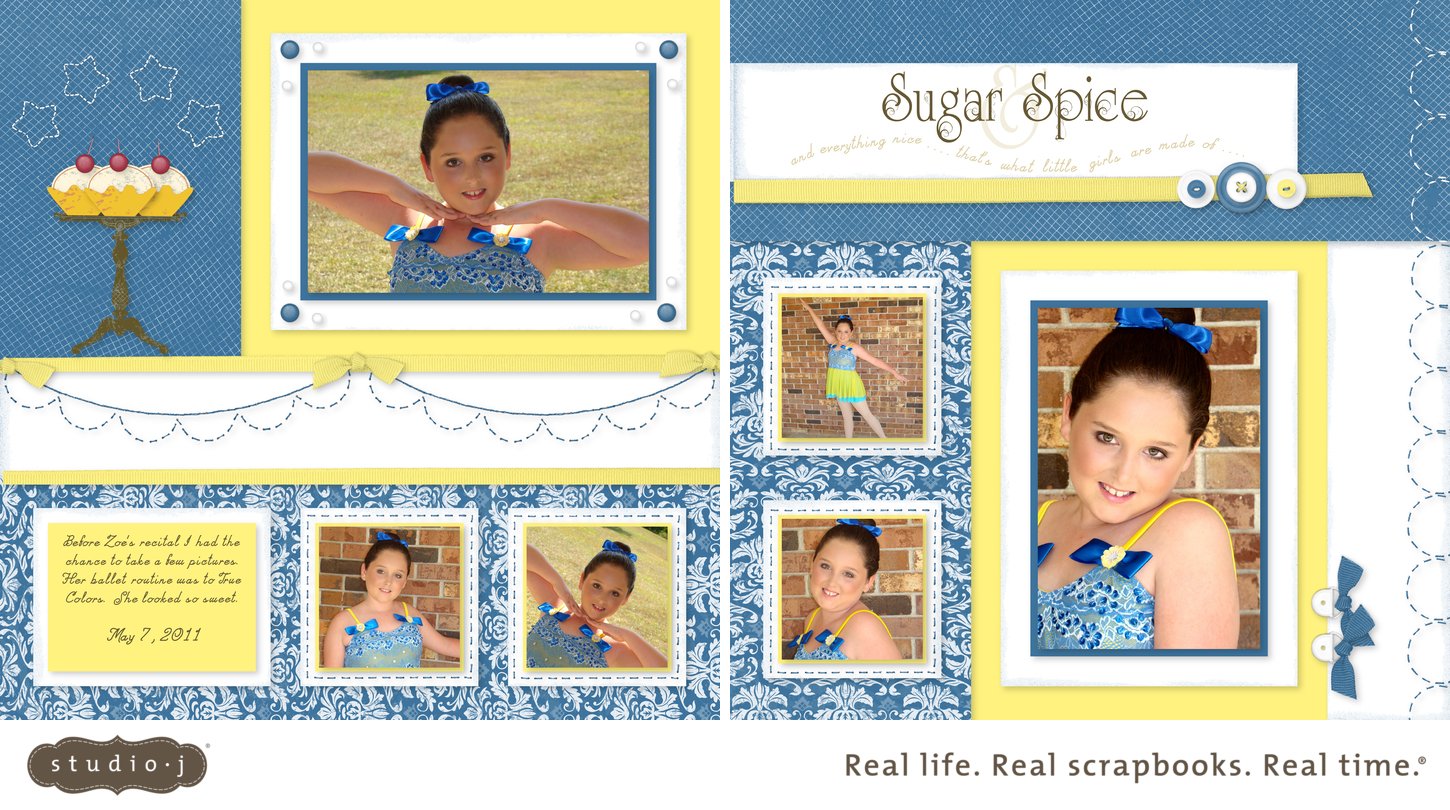
Here is the second layout of our 5 layout  Studio J homework assignment.  This one got really creative with the stickease and color changes. 


This kit is actually the Halloween kit offered in last year's fall issue of the idea book.  Who'd a thunk it?  The assignment started out like this:

Kit:  Mischief
Pattern:  Dynamic Duo
Techniques:
  • Altering the look by changing the colors of B&T papers
  • Rotating a page
  • Using a vellum text box to lighten a color
  • Converting a photo well to a text box
  • Creating your own embellishments   
It would never have crossed my mind to use the Halloween kit to make a sweet little page like this.  This is a prime example of the versatility of this program.  Those little cupcakes started out as a candelabra and candy wrappers, cropped, rotated and well placed. lol.  The cherries on top are brads and the stems are staples.  I thought that was the neatest thing.  

You should check out how this paper kit starts out and compare to the end product.   It really blew me away and I was the one making it!

Thanks for stopping by.  Happy Scrapping!     

Sunday, June 17, 2012

Studio J Homework - Finally done!

It just so happens that I am fortunate enough to get to go to convention for Close to My Heart this year.  I am soooo excited.  Everyone who is attending this year had homework to do prior to the convention.  All attendees got the chance to create five 2-page layouts.  The homework part is they assigned certain paper kits and layouts to use for each one.  They have all kinds of techniques they want everyone to be familiar with before convention.   It proved more challenging than I intended, only because my decision making skills are horrible :)

For those of you haven't tried Studio J, you really should give it a shot.  I am a classic scrapper.  I like getting my hands dirty and my desk messy.  But there is a place in my heart for Studio J as well.   I have also done digital scrapbooking with Photoshop and Paint Shop Pro.  It can be quite tedious with those programs.   Close to my Heart has elminated all that tedious work and created a program that allows you use of the digital versions of all the wonderful papers and embellishments they have.  There is no program or supplies to buy, only a membership and then the printed layouts you create.  So you don't have to worry about using space on your computer for the software.  You upload your pictures and use their online program.  As long as you have a computer and an internet connection, you're in business.  So whether you are sitting in the doctors office, in the pickup line at school, a friends house, or at your home, you can scrapbook. 

I just finished up my layouts today.  With the purchase of the layouts, as a member, you also get free .jpgs of your creations.    This enables you to post them online, as I am about to do, or put them in your screen saver rotation, which I am also about to do.   Here is layout #1:


The assignment started out like this:

Kit:  Lucy
Pattern:  Stars Above
Techniques: 
  • Deleting unneeded photos wells
  • Using text boxes to cover up portion of the pattern
  • Cropping My Stickease borders to make ribbon streamers
If you log into StudioJ and pick that kit and that pattern, you can see there are some differences.   I did follow the assignment directions exactly but then I added my spin on it. 

To keep this from being an incredibly long post, I'll add the rest of the pages one at a time for the rest of the week, so come back and see my creations.   Check out Studio J if you already haven't.  It's free to browse around. You can even create a layout or two and see how you like it.  

Thanks for stopping by.  Happy Scrapping!


Thursday, June 7, 2012

Heart 2 Heart Weekly Challenge - Black and White and One Color

This week over at  Heart 2 Heart they have a color challenge going on.  Their challenge is to make something with black and white with a splash of color.  I just finished a card that fits that bill.  Black, white and Tulip it is.


This is just a standard card size.   I had all these little scraps of white paper leftover from another project I had done.  I couldn't let it go to waste.  So.....I stamped it :) The stamps used are Hooray Bouquet, You've Got Flair, the Pemberly WOTG stamp set, and You Are.    I cut the flowers and medallion from the AP cricut cartridge.  Stamp, trim, glue and voila, a card. 

Just so happens I was working on a little set of note cards that was black and white and tulip, too.  These are  4x4 cards, and are made just like my little 3x3 set I had on here previously. These are always fun to make.   They are easy and cute, too,  I think.


Again the stamps are Hooray Bouquet and the Pemberly WOTG set.  Super simple cards they are.  Stamp the background on half of the face.  Cut a small strip of black cardstock.  Ink your little precut flower and glue.  The Hooray Bouquet stamp set is definitely one of my most used stamp sets.  It's just so fun :)

That's all for me tonight.  Thanks for stopping by.  


Happy Scrapping!
 

Saturday, June 2, 2012

H2H Weekly Challenge - Add a Photo

This week the challenge over at Heart 2 Heart was to add a photo to your layout.  This layout is the last of my daughter's dance pictures I had for this year.  The other two were her single pictures of tap and clogging and this was of their jazz group.  Although it wasn't our favorite costume, it did make a striking picture against the white backdrop.  Burnin Love was the song they danced to, hence the title.


I wanted to keep it fairly simple by just using the colors in the photo. I definitely didn't want anything to upstage my dancers.  The patterned paper was actually made from a stamp in the Love Life set.   I used black ink on white daisy cardstock and repeated the stamp to make it a background.  The stars are from that set, also.  This set has been around a while, but I love it.  You can't really tell from the picture, but the little stars were embossed with our clear detail embossing powder for a little extra shine on the pattern and the larger stars have sparkles on them.  Love was cut from the red cardstock and then coated with liquid glass (have I mentioned I love that stuff?).  The ribbon on the tag is our color ready seam binding ribbon daubed with ink. 
When I saw this picture, I immediately thought stars.  Just a few stars on the page to compliment the stars in the picture.  Keep shining girls! 

If you haven't checked out all the wonderful layouts and cards over at Heart 2 Heart, you shoud head that way.  They have some crazy talented folks over there. 

Thanks for stopping by and have a great weekend.  Happy Scrapping! 


Friday, June 1, 2012

Stampaganza

This month Close to My Heart is having a Stampaganza.  Now is the time to get those stamp sets that have been on your wish list.   For every two stamp sets you purchase, you get a third of equal or lesser value for FREE!   Whether you want to stock up on the quick card stamps or enlarge your alpha stamp set collection, now is the time to take advantage of this great deal.  

For those not familiar with the quick card stamps, I posted this nifty video to show you a few.  At $6.95 each, these fun A size stamp sets are perfect for whipping up some great cards in just minutes. 


Happy Scrapping!

Sunday, May 27, 2012

More Dotty

I couldn't help it, there's more Dotty for You.  This paper is great.   You still have a few more days to get your own.  Then it will be gone after May 31st.   I did take a break from it this weekend.  But I finished one up before I started on my Stella stuff.  It was a weekend of firsts for me.  First long card, first altered item, first time using a stamp set I have had for a while, and now first time doing a layout without pictures in it.  I know it seems weird, but I have never been able to let go enough to do a layout without the pictures.  Just makes me think something's missing.  I was inspired by a layout from, forgive me if it's not correct, Scrapbook Generation, I do believe. I saw it a while back.  When I saw our big polka dot print in the Dotty pack, I knew what I wanted to do with it.


Everything is ink distressed with either Sweet Leaf, Lagoon, or Grey Wool inks.  I threw in a few buttons from my stash with some Baker's Twine and here we have it.   The title on right page is made from letters cut from the Cricut AP cartridge and then coated with liquid glass (I'm still in love with it).   They were cut from the big polka dot paper, coated and then mounted on lagoon cardstock which had been stamped in lagoon ink with the flourish from the Love Life stamp set. I used 3d foam tape and popped it off the page.  The one on the left page is from the stamp set Family Love. 


I used my trusty little daubers and graduated my ink colors from the Grey Wool on bottom through Lagoon and then to Sweet Leaf on top, then stamped my paper.   I love being able to do that.  I think it adds even more interest to a stamped image. 

There we have it.  My first layout without pictures.  And it didn't kill me or anything :)  

Off to work on my StudioJ project.  Thanks for looking.    Hope to see you again soon! 

Happy Scrapping!


H2H Weekly Challenge - Distressing

This week over at Heart 2 Heart Challenge Blogspot, the lovely ladies have concocted a challenge to include something distressed.  Since I have been introduced to Close to My Heart, I think I pretty much ink distress everything I do.  I remember in the beginning when I was a first time customer and I told my now upline  that I didn't want the stamp of the month, because, well I really wasn't a stamper and I didn't do ink.  She just looked at me and smiled and said, "uh huh..ok."  She kept smiling because she had that knowledge that I, too, would be hooked.  I must say, I am hooked.  I'm a stamping fool and I play in ink every chance I get.  Thanks Belinda!

This weekend I decided to pull out my Stella paper. I do love Stella.  This was my first attempt at an altered item.  I have a co-worker who said she would like to see a box in Stella if I did one.  Well...I did one. 


At first I wasn't sure how I was going to seal this.  I thought Mod Podge!  Apparently, it's been a while since I decoupaged anything.   Although it's hard to tell from these photographs, I ink distressed all the papers prior to putting them on the box.  The box itself is our My Creations Card Box, which is plain white.  I inked all the corners with cocoa ink.  It looked great, then when I started to decoupage over that, it starting changing colors.  It actually looks a bit verdi gris.  I was upset at first, then it kind of fit.  I thought it added a little age to the box.

All the shapes were cut from the Cricut AP cartridge.  What would I do without that thing? Everything thing else is straight out of the Stella Paper Pack.  I added a few sparkles and a pewter badge button.  Voila!  

When I got through with my box, I had a bunch of little pieces of paper left.  What better to do than make cards, right?  I did a layout, a box, a birthday card, and then all the cards I made today and still have some paper left from this one paper pack.   Here's what I have come up with so far.


I realized that I hadn't had a chance to use the Stella WOTG stamp set.  I definitely had to fix that :) All the papers were ink distressed.  I thought the Stella went well on the kraft paper.  It was my first long card as well. I had several firsts this weekend.   The little cards in front were so fun.  They have their own little holder to keep them in.  I had accidentally cut some paper too short, so it was time for some 3x3 cards.  I had seen on Vicki Wizniuk's page,  the Wizard's Hangout,  this great little set.  It's under her free templates section.  For those who haven't checked her page out, she has some beautiful cards.  This was my version of that card set with Stella papers.


Kind of hard to tell what's going on here, but they all fold up in one cute little package.  With a little band around them to keep the package together.


It holds four cards and their envelopes.  Super simple and fun.  And made with a happy mistake :)

I didn't mean for this post to run on forever, but I had new goodies to share.  I love days when I can actually get something done, creatively speaking.  Thanks for stopping by.   I hope to be working on more soon. 

Happy Scrapping!