Wednesday, September 19, 2012

Clearly the Best: Spanning the Space

For those who don't know, Close to My Heart now has videos on My Craft Channel.   The newest video is called Spanning the Space.  It has some great tips and techniques.  Personally, I like to lift ideas from the table, too...lol.  


Hope you enjoyed the video.  If you see anything you just can't live without, feel free to contact me and I'll see about getting it to you as quickly as I can.   Thanks for stopping by.  Until next time...

Happy Scrapping!

Monday, September 17, 2012

Back to School

After I started scrapping, I went back and gathered all my child's school pictures.  I always felt like it was such a shame that you had all these school pictures and usually they are just in a drawer somewhere after their year had past.   Traditionally, I always take pictures on the first day of school. So now I have a school days book and each year I have a two page layout devoted to the first day of school and her class picture(s).   First day is left page and class picture(s) is on the right.  I finally got around to putting together last year's pictures.  I was totally stumped, probably by the colors she was wearing.  But then I thought, why not go with school colors.  It just so happens that Gypsy is pretty spot on for bullpup purple.  It was her first year as a Bullpup and their colors are white and purple.


It gave me a chance to use our School is Here stamp set, too.  "I <3 school", may be a bit of a stretch, but it was still fitting. I used our Gypsy marker set to color in the hearts.  They matched perfectly.   I cut all the lettering and the "girl" from the new Artiste Cricut cartridge.  I used liquid glass (yes, I still love it :)) on the "6 th" for some added gloss and used the Stardust Glitz Glitter Gel to highlight "girl."  The striped purple paper is Gypsy cardstock that I scored at half inch intervals and lightly sanded across the top.  Just one more reason to love our cardstock.  I threw in some brads and bakers twine for good measure.  The cute little dog print border was from an ek Success punch I had.  She started the year with feathers in her hair.  I saved those and incorporated them in the layout, too. 

I have already started thinking about this year's school pictures.  Is it wrong of me to tell my child, "No, you can't wear that for school pictures.  It won't match the paper I plan to use on your school page?"  Hmm..oh well..lol. 

Thanks for stopping by.  Until next time..

Happy Scrapping! 

Saturday, September 15, 2012

Many Mini Thanks

I think I just like saying that...many mini thanks.   I love mini cards.  I had made a few thank you notes to accompany my last gathering's  orders.  Everyone likes different things, so everyone got a different thank you card.  
This one was not so mini, but a thank you, nonetheless.  It was cut at 4" on the new Artiste cartridge.  It's the perfect size to hold a petite perks stamp set.


I cut the card on kraft cardstock.  The pumpkin stamp is from Fall Favorites, which is September's stamp of the month. I stamped it  on Colonial White cardstock and  I used our new alcohol markers in Autumn Terracotta, Olive, and Topiary to color in the pumpkins.  The frilly circle behind it is Olive cardstock, also cut from the Artiste cartridge, and the background is from our Flirty paper pack.


Here's another one using our Fall Favorites stamp set.  I just love these little pumpkins.  I stamped directly on my cardstock with Cocoa ink and again used my Autumn Terracotta and Olive markers. The thank you is from the Casual Expressions stamp set.   The strip on the left is our new burlap ribbon.  I cut it in half for this little card.  I topped it off with a strip of thin brown ribbon I had in my stash.

If you are doing cards with the new markers, I do recommend that you do all your coloring on a separate piece of cardstock and then adhere it to the card.  It does have some bleed through.  On these I made a little card face which allowed me to hide my ribbon ends, too, then attached it to my 3x3 card.

I still like our Stella paper pack.  Here's another one on kraft cardstock.  


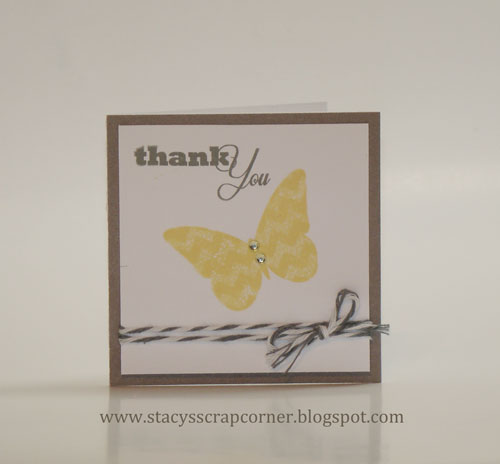
Then last, but not least, the yellow butterfly. Such a simple card, but I liked the way it turned out.


Here's the same sentiment, but stamped in Slate.  The butterfly is from the It's Your Day double stamp set that is available until the end of this month for only $5 with qualifying order.  I stamped the butterfly on White Daisy cardstock with Buttercup ink.  The butterfly is a shade and base type stamp.  They have a smooth butterfly stamp and then one with the chevrons.  Using the same color ink you stamp the solid and then the chevron over it. I love the effect.  I wrapped it with some grey and white baker's twine and topped it off with two little sparkles.

Thanks for stopping by.  Have a great weekend!


Thursday, September 13, 2012

Adding Color to Your Crafts

Close to My Heart has put out this great little video introducing their new color palette.  I thought I would give everyone a chance to see.  Wonderful ideas on the table, too.


I've been busy going through some of my older papers, but I hope to be posting some goodies soon.

Happy Scrapping!

Monday, September 3, 2012

Mini Card Challenge at Heart2Heart

This week at Heart 2 Heart the challenge is mini cards.  I LOVE mini cards.  They are fun to make and can be made for so many purposes and let's face it, they are so darn cute!    I probably make as many mini cards as I do anything else.   Here's one I had made with the the Love Blooms stamp set.  I use this set ALL the time.


I felt like playing with our new markers so I thought this would be a good coloring page.  I had colored these roses in the same manner in my Flirty layout from convention.  I just love these two colors together.    This is Autumn Terracotta and Hollyhock on the blooms and Olive on the leaves.  I added a little strip of raspberry B&T from the Flirty paper pack and added a little strip of black cardstock.  I had some black grosgrain ribbon so I made a little bow and topped it off with a recycled decorative brad.

These 3x3 cards are so versatile.  They can accompany a gift or just be given as a little pick me up all depending on your sentiment.   The possibilities are limitless.  And it's the perfect use for all those little scraps from your other projects much like my little thank you card I had in my Avonlea Leftover post.

Thanks for stopping by.  I hope everyone is enjoying their labor day weekend.  Until next time...

Happy Scrapping!

Friday, August 31, 2012

Project Inspiration - Make it from Your Heart

Close to My Heart has done it again.   I have mentioned it before, but the Make it from Your Heart how-to book is really a must have.   With the release of the new Fall/Winter Idea book, came this new book.  The pricing is quite affordable at just $7.95 and is packed full of new recipes.  Here's a video to  tell you about a few of its features. 


I love this little jewel.  Visit here to get yours today.  It will definitely fuel the inspirational fire. 


Tuesday, August 28, 2012

Cricut Card Holder

I'm still investigating all the images and 3d projects on our new Cricut Artiste cartridge.  I doubt I will ever be able to cut them all out.  I kept seeing these nifty little card holders on the boards but had never tried one for myself.  I found them and put a couple together for myself.  I LOVE them.  These would make such great gifts, too.  Who wouldn't love a set of cards in a matching card holder?


I had been making cards from the freshly retired Sonoma paper so I thought it only fitting to make them their own holder.  You cut the holder on 6" to hold your standard 4.75x5.5 cards.   There are actually seven embellished cards and their envelopes in this holder.  I would say that was the maximum.

What I used for this one was the Sonoma B&T and Bamboo cardstock.  I decided I would use my new monogram stamp.   They fit on a 1.25" circle, which is perfect since we have a 1.25" circle punch.  The leaves were cut from the Cricut in Olive cardstock.  The edges were inked in either Smokey Plum or Bamboo.   The flowers were little white paper flowers that my friend had given me long ago.  I took our Smokey Plum alcohol markers and colored them.  It worked great.  I colored the little pearls in the center of the flowers with the same markers.  The white was too stark to me, so the markers just gave a hint of color and softened them just enough.

That's it for me tonight.  Back to work for me tomorrow.  It seems that Isaac has spared us so far.  Tomorrow may prove differently.  Stay safe everyone!

Thanks for stopping by.  Happy Scrapping!